Saturday, October 11, 2008

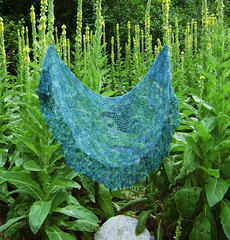
Treasure Chest Shawl

This shawl is a super simple half circle shawl with a shaped neck and curving wings that help it to stay on. If you repeated the increases in the frost flowers pattern, you could probably get it to wrap and tie in the back with about 3 more repeats of the lace stitch

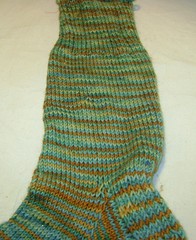
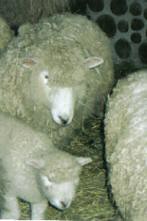
700 yd. fingering wgt. handspun ( I used 'treasure chest' batts from the hooves club
size 7 US circular
stitch markers

Loop CO 5 sts.

1) k1, yo, k to last st, yo, k1
2) k all sts
3) k1, yo knit to last st, yo, k1.
4) k all sts
5) rep row 4
6) repeat row 5 (35 sts)
7) repeat row 4
neck shaping
8) k to last 10 sts, wrap st and turn, knit to last 10 sts, wrap st and turn

continue this wrap and turn on each side for 5 wraps per side.
9) k all sts
10) k1, you, k4 pm, yo, (k5 pm, yo - repeat to the last 5 sts) k4, yo pm, k1
rows 11-13) knit on knit side, purl on purl side

repeat rows 10 -13, adding one stitch in the k4, and k5 places in row 10 - essentially increasing every 4th row, and one increase per section in that row.


At 20 sts between increases, replace you with k1, m1 to close eyelets. Also, k1 at beg of row and yo, do the same at end of row, yo, k1. Place marker in yo sts. Now, as you knit or purl each row, you will leave that new section you've created on either end of the shawl in a stockinette st. Increase by k1, yo and at the end by knitting in same pattern to the end , yo, k1 on every knit row. Note: You will continue to increase each section only on the fourth row, including the wings you've just created.

At 34 sts per section, begin the frost flowers lace pattern stitching. I found a pdf chart for it here - or you can find it in the First of the Barbara Walker treasuries. Each 34 sts section is 2 repeats of the lace pattern. Add a stitch at the beginning and end of the first row of lace pattern the first time only - to equal 34 sts per section plus 2 on either end of the whole row.

You could replace this stitch with any lace stitch so play and experiment.

Tuesday, September 16, 2008

My simple socks......

131Simple Socks Pattern
By Enchanted Knoll Farm


These socks are fabulous for hand-dyed yarns, for that basic structure when you're first starting out, for a base when you want to insert a great stitch pattern of your own, or for doing detail embroidery work on. Stripes are also an option.

The ribbing is optional - use what you like best. The heel, I have found, wears better than any other heel flap. Calf shaping included.

Yarn – Enchanted Knoll Farm Superwash Sock Yarn 90/10 superwash merino/nylon sock yarn. 1 skein
Needle - I used US 0 needle for these but a gauge of 8 sts per inch is your goal – many can achieve it with a US 1 (2.25 mm) needle

1. Cast on 64 sts work this rib pattern
k1, p1 rib for four rows,
then switch to k3, p1 rib for 4 inches
It makes a very stretchy calf rib for longer socks which I like because I have ample calves!

2. knit every row, decreasing by k 2 tog. on the back of calf every 4th row 4 times. Knit every row until you have 7-8" or desired length of your sock leg.

3. take ½ ( minus 2 sts on each side) of your stitches on the back of the leg and put them on one dpn. Always slip the first stitch for heel flaps - it makes picking up the flap stitches for the gusset soooo much easier!


Work the flap for the length measured from your ankle to just above the bottom of your heel as follows:

purl all sts on purl side
knit side: slip 1st st and proceed with sl 1, k 1 to end

This makes a durable, stretchy heel that fits and wears well!

4. turning your heel:
on a knit row of heel flap, knit 1, slip 1 to last two sts, wrap 2nd to last st and turn, purl to last 2 sts, wrap 2nd to last st and turn. Continue this pattern, wrapping the st before the last wrapped stitch until you ‘ve wrapped 1/3 of the heel flap sts on each side (ex: if there are 24 heel flap sts, repeat this pattern until you have 8 wrapped sts on each side).
5. on knit side, knit, picking up wrapped st wraps and knitting the wrap and stitch together to end. Join to gusset and begin gusset decreases. Remember to p/up wrapped sts on the other side of the heel flap when you get around to them (after you’ve knit the instep sts)
Gusset decreases:
knit in the round, decreasing one at the sides of the ankle (forming the gusset) by k2tog every other row until you have the original 16 sts per dpn. Then, just knit around for the length of your desired foot minus 1.5 inches. When you get there, begin shaping the toe by decreasing one stitch per dpn (again, on the ankle sides so you'd start at the back of the ankle and k all sts till only 2 are left, k2 tog. On needle two, you'd begin by k2tog then knit all the remaining sts. On needle 3, knit all to last 2 sts, k2tog, on #4, k2tog, then knit remaining sts.)every other row for 1.5 inches then bind off using kitchener stitch!

This pattern is copyrighted by Enchanted Knoll Farm. Pattern provided for private, personal use only. Express permission required for distribution.

Friday, July 11, 2008

Mermaid Wings Shawl

mermaid wings shawl

3 skeins Enchanted Knoll Superwash Sock yarn (2 in Queen Mermaid, 1 in Mermaid)

Size F crochet hook.
Shawl measures 72” wide and 30” deep at center


Stitch pattern: urchin stitch from The Complete Encyclopedia of Stitchery by Mildred Graves Ryan

Begin with foundation chain in an even number of stitches
Row 1: Chain 1 Repeat the following to end *skip 1 stitch, in next stich, take 1 single crochet, 2 chains and one single crochet.
Row 2: follow directions for first row, inserting hook in chain 2 space of previous row for pattern stitches
Repeat Row 2 until work is completed.


Increasing Urchin stitch: at increase points, make 2 urchin sts in the chain 2 space

Dc= double crochet
Ch=chain

1. Chain 4, join
2. Dc 7 into a ½ circle in the ring
3. Dc 2 times in each stitch (14 sts)
4. Dc once in each st.
Continue rows 3 and 4 with the increases in dc’s being extended by 1 every round. For instance, row 5 would be dc 2 times in 1st st, dc 1 time in next st – repeat to end. Row 7 would be dc 2 times in 1st stitch, dc 1 time in each of the next 2 sts, repeat to end.

At 104 sts, place a stitch marker ( I used a tied on strand of contrasted yarn loosely hitched so it could be removed later) every 13 sts (8 mkrs total). This is where you will increase every other round in urchin stitch. Also, inc in the 1st and last sts on that round, making a semi-circle, winged shape to the shawl.

After crocheting urchin stitch for 7 “ (unstretched), place marker 5 sts into row and 5 sts before end of row. This is now another increase point which will give your shawl even more flair and wing shaping. Optional color change : At this point, I changed to a matching but slightly varied patterning yarn for a border effect. You can continue in your same color if you like – or try adding beads every increase point to have a dazzling border!

Continue to crochet 5-7 more inches, weave in ends and block. This shawl measured 72” across and 30” deep at the center.

Wednesday, January 16, 2008

The Knightly Baclava

handspun knits 008This is more of a 'recipe' than an actual pattern - which is typical for my knitting style. I used two strands of fingering wgt. softly spun handspun but you could substitute any worsted wgt-ish yarn.

Yardage: Roughly 150-200
Needles: size 5-7 dpns
gauge: 3 sts per inch
size : small (toddler), med, adult If only two number in (), the last is the same for both medium and adult


Cast on 3 sts on three needles.
1. K1, m1 each needle
2. K1, m1 all sts
3. Knit (12 sts)
4. K1,m1, k to last st, k1, m1
Repeat rows 3 and 4 (4, 5 times) more.
5. Re-distribute to 4 dpns. On needle 1 (12 sts) – k1, p1 rib. On needles 2,3, and 4, knit in the round.
Repeat row 5 (6,8,10 times) BO all sts on needle 1.
6. Knit needle 2 (purl on wrong side), k1, p1 rib on needle 3 (this is the shaping for the back of the neck – a little stretch added with the rib and a close fit for extra warmth) and knit on needle 4 (purl on wrong side).
Work (3, 5, 7) rows as in row 6.
7. On last knit row, k1, m1, k to last stitch, m1, k1 (keep the k1, p1 rib on needle 3)
8. Purl all sts. Except keep the rib on needle 3.
Repeat rows 7/8 (4, 5, 6 times)
9. Join back into the round. K all sts on needles except needle three, keep in the ribbed pattern.
Repeat this row (4, 5, 6 times)
10. K1, p1 all around for (4,6, 8 rows)
11. Change to contrast color. Needle 1 is now the chin. On needles 1, 2,3 : k1, m1 knit to last st, m1, k1, every 3rd row for 3 inches.
12. Knit 4 rows moss stitch.
13. Bo all sts.

Friday, November 30, 2007

Hedwig Puppet Pattern

coming soon