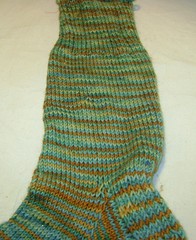
My simple socks......
 Simple Socks Pattern
By Enchanted Knoll Farm
These socks are fabulous for hand-dyed yarns, for that basic structure when you're first starting out, for a base when you want to insert a great stitch pattern of your own, or for doing detail embroidery work on. Stripes are also an option.
The ribbing is optional - use what you like best. The heel, I have found, wears better than any other heel flap. Calf shaping included.
Yarn – Enchanted Knoll Farm Superwash Sock Yarn 90/10 superwash merino/nylon sock yarn. 1 skein
Needle - I used US 0 needle for these but a gauge of 8 sts per inch is your goal – many can achieve it with a US 1 (2.25 mm) needle
1. Cast on 64 sts work this rib pattern
k1, p1 rib for four rows,
then switch to k3, p1 rib for 4 inches
It makes a very stretchy calf rib for longer socks which I like because I have ample calves!
2. knit every row, decreasing by k 2 tog. on the back of calf every 4th row 4 times. Knit every row until you have 7-8" or desired length of your sock leg.
3. take ½ ( minus 2 sts on each side) of your stitches on the back of the leg and put them on one dpn. Always slip the first stitch for heel flaps - it makes picking up the flap stitches for the gusset soooo much easier!
Work the flap for the length measured from your ankle to just above the bottom of your heel as follows:
purl all sts on purl side
knit side: slip 1st st and proceed with sl 1, k 1 to end
This makes a durable, stretchy heel that fits and wears well!
4. turning your heel:
on a knit row of heel flap, knit 1, slip 1 to last two sts, wrap 2nd to last st and turn, purl to last 2 sts, wrap 2nd to last st and turn. Continue this pattern, wrapping the st before the last wrapped stitch until you ‘ve wrapped 1/3 of the heel flap sts on each side (ex: if there are 24 heel flap sts, repeat this pattern until you have 8 wrapped sts on each side).
5. on knit side, knit, picking up wrapped st wraps and knitting the wrap and stitch together to end. Join to gusset and begin gusset decreases. Remember to p/up wrapped sts on the other side of the heel flap when you get around to them (after you’ve knit the instep sts)
Gusset decreases:
knit in the round, decreasing one at the sides of the ankle (forming the gusset) by k2tog every other row until you have the original 16 sts per dpn. Then, just knit around for the length of your desired foot minus 1.5 inches. When you get there, begin shaping the toe by decreasing one stitch per dpn (again, on the ankle sides so you'd start at the back of the ankle and k all sts till only 2 are left, k2 tog. On needle two, you'd begin by k2tog then knit all the remaining sts. On needle 3, knit all to last 2 sts, k2tog, on #4, k2tog, then knit remaining sts.)every other row for 1.5 inches then bind off using kitchener stitch!
This pattern is copyrighted by Enchanted Knoll Farm. Pattern provided for private, personal use only. Express permission required for distribution.
posted by Josette at 11:04 AM
0 comments
![]()